
Every dive in Dive or Die- Children of Rain costs something you can’t get back: time.
The flood never waits, and each day you spend underwater moves the countdown closer to the end. You must recover all eight Eldritch Idols, build a solid camp, and prepare your survivors for the deeper biomes. This means every expedition needs a purpose. A wasted dive for a few common materials can prevent you from getting an idol later.
This Dive or Die guide starts with the essentials that matter most during your first playthrough. You’ll discover which beginner mistakes slow your progress, how the flood timer works, and which survivor traits are worth recruiting or avoiding. Once you understand these systems early, they will make the rest of your journey much easier.
Common Beginner Mistakes to Avoid
The game doesn’t punish you right away for poor decisions. Instead, small mistakes add up until you suddenly realize you’ve wasted valuable days without making real progress.
Here are the mistakes that hurt new players the most.
Recruiting Every Survivor
It might feel wrong to leave some survivors behind, but recruiting everyone is not a good choice.
Each survivor comes with a random Inherent Trait, and some traits are much stronger than others. Filling your camp with weak or problematic survivors increases food and morale upkeep while offering little in return.
Instead, wait for survivors with helpful traits or better starting potential. A smaller camp with strong divers usually performs better than a crowded one filled with bad traits.
Upgrading Every Building Immediately
Not every building deserves your resources early on.
Some upgrades require rare materials that become much more valuable later in the campaign. Spending them on low-priority buildings can delay equipment upgrades and exploration.
Your first priorities should be:
- Workshop
- Diving Deck
- Altar
These buildings unlock stronger equipment, faster exploration, and important progression systems.
Diving Without a Clear Goal
Every dive starts the Flood Countdown.
Before leaving camp, decide exactly what you want to achieve.
Examples include:
- Recover an Eldritch Idol
- Gather materials for a building upgrade
- Unlock a shortcut
- Find a blueprint
- Bless a biome
- Collect specific crafting resources
Going underwater without a plan often results in another lost day and a backpack filled with unnecessary materials.
Ignoring Nutrition and Morale
Nutrition and Morale affect much more than camp management.
When either value drops too low, survivors begin suffering penalties that reduce their effectiveness. Some traits can make these penalties even worse.
Keeping both values stable is usually cheaper than dealing with problems later.
Leaving Survivors Injured
Injuries don’t heal on their own.
A badly injured diver starts future expeditions at a disadvantage, making every encounter more dangerous. Small amounts of damage may not seem important after one dive, but repeated expeditions without recovery can quickly become an issue.
Heal your best divers whenever possible instead of sending them back into dangerous areas at half strength.
Spending Rare Materials Too Early
Some crafting materials are surprisingly hard to replace.
Items like Blessed Resources and other late-game materials become crucial for advanced upgrades. Using them as soon as you get them often leads to unnecessary grinding later.
Whenever you discover a rare material for the first time, check if it’s needed for an important building before crafting optional equipment.
Understanding the Flood Countdown
The Flood Countdown is the game’s main time limit.
Every day you spend diving advances the countdown, so effective planning is just as important as surviving underwater.
Campaign length depends on your difficulty.
| Difficulty | Days Available |
|---|---|
| Normal | 40 Days |
| Hard | 30 Days |
The Altar offers a way to extend the timer, but extra days aren’t free.
Every extension requires valuable sacrifices or resources. Avoid buying extra time just because it’s an option.
Extend the countdown only when you know how you’ll use those additional days. A well-planned extra day can secure another Idol or important upgrade. A poorly planned one just delays the inevitable.
Survivor Traits Explained
Every survivor you recruit from the Lighthouse arrives with a permanent Inherent Trait.
You can’t reroll, remove, or replace these traits later, so your recruitment choices matter throughout the campaign.
Some traits improve diving performance. Others make camp management easier. A few can completely change how a survivor plays.
In addition to Inherent Traits, survivors can also gain extra traits through:
- Leveling up
- Mutations
- Blood Moon events
- Singing/Chanting Moon events
- Special fish from the Fishing Hut
- Certain camp events
These extra traits can turn an average survivor into one of your strongest divers.
Information researched by Zamora and collaborators. Original source: Steam Community Guide.
Best Positive Traits
| Trait | Effect | Notes |
|---|---|---|
| Adrenaline Rush | +15% swimming speed below 25% Health and below 25% Sanity | Great for escaping dangerous situations. |
| Blessed Blood (Event Only) | Sanity Leeches die shortly after attaching. Sacrificing this survivor grants +30% Worship Gauge. | Earned during a Blood Moon event. Excellent for Altar-focused runs. |
| Calm | Low Camp Morale no longer damages Sanity. | Removes one of the biggest camp penalties. |
| Healthy | Low Camp Nutrition no longer damages Health. | Strong for long campaigns where food becomes tight. |
| Iron Lungs | Dashing no longer consumes extra Oxygen. | One of the strongest exploration traits. |
| Keen-eyed | May discover additional resources while diving. | Community testing suggests this gives around a 10% chance to duplicate gathered resources, making it one of the best gathering traits. |
| Serene | 50% lower Oxygen consumption while standing still. | Helpful while observing enemy patterns or solving puzzles. |
| Vigilant | 50% higher chance to prevent survivors from going missing. | Strong camp utility during expeditions. |
| Dextrous (Rare) | Tool cooldown reduced by 1 second. | Community reports show this also affects tools like the Diving Knife and guns, making it surprisingly powerful during exploration. |
Neutral Traits
These traits aren’t automatically good or bad. Their value depends on your playstyle.
| Trait | Effect | Verdict |
|---|---|---|
| Coward | +15% Dash Speed but slowly loses Sanity near enemies. | Great mobility if you avoid prolonged fights. |
| Hypochondriac | 10% of Health damage also reduces Sanity. Healing Balms restore twice as much Health. | Manageable if you carry healing supplies. |
| Masochistic | Takes 30% more Health damage. Restores 10% of lost Health as Sanity. | Risky but usable for experienced players. |
| Obsessive | 30% lower Carry Capacity. Duplicate items weigh 10% less each. | Works well when farming large amounts of the same resource. |
| Tenacious | Carry Capacity can exceed its limit by 15%, but Swimming Speed drops by 50%. | Better for short mining trips than long exploration dives. |
| Unnatural Regeneration | Fully restores Health after every dive but cuts maximum Health by 50%. | Excellent for careful players who rarely take damage. |
| Finned Hands (Event/Fish) | +20% Swimming Speed but Tool cooldown increases by 1 second. | Fast movement comes at the cost of slower tool usage. |
| Amphibious Lungs (Event/Fish) | +50% Oxygen Capacity but loses Health and Sanity on days you don’t dive. | Strong for active exploration, poor for idle camp days. |
Negative Traits
These traits usually create more problems than benefits.
You don’t always need to reject survivors with these traits, but they require extra attention.
| Trait | Effect |
|---|---|
| Anemic | 30% lower maximum Health. |
| Anxious | Takes double damage from low Nutrition and Morale. |
| Complacent | Becomes Fatigued immediately after changing jobs. |
| Compulsive Eater | 50% chance to consume double daily Food. |
| Distracted | 15% chance for resource nodes to become invisible. |
| Edgy | 50% chance to consume double daily Morale upkeep. |
| Nyctophobic | Slowly loses Sanity while diving with the light turned off. |
| Short-sighted | Greatly reduces your vision radius underwater. |
| Unstable | May injure themselves or other survivors while staying in camp. |
Several of these traits only impact camp management, while others complicate underwater exploration. Short-sighted, Distracted, and Nyctophobic are particularly frustrating because they directly hinder exploration, where every second and resource counts.
Which Traits Should You Prioritize?
If you’re assembling your first dependable diving team, these traits consistently offer the most value:
you’re building your first reliable diving team, these traits consistently provide the most value:
- Iron Lungs
- Keen-eyed
- Dextrous
- Blessed Blood
- Healthy
- Calm
- Vigilant
For gathering specialists, Keen-eyed is a strong choice due to its ability to duplicate collected resources. For exploration, Iron Lungs and Dextrous significantly improve survivability and speed. Meanwhile, Healthy and Calm reduce the effects of camp shortages, which becomes more important as the Flood Countdown approaches zero.
Map Mechanics Explained
Every biome in Dive or Die – Children of Rain introduces new hazards that require you to adjust your exploration tactics. Rushing into a new area without understanding its mechanics often leads to wasted healing items, lost sanity, or a dead diver.
Here’s what you should expect in every major region
The Shallows
The Shallows is the first biome you’ll explore, but it’s not as safe as you might think. Several mechanics introduced here appear throughout the rest of the game.
Seaweed
Seaweed strikes out whenever you get close.
You can destroy it repeatedly for crafting materials, but it doesn’t give any experience, so farming it won’t help you level up
Vines
Large vines block several pathways.
Your Diving Knife removes them instantly, creating shortcuts and hidden routes. These vines grow back after the map resets, so don’t expect permanent openings.
Rain Eaters
Rain Eaters are the first standard enemies you’ll face.
They cause direct Health damage and mainly teach you basic movement and positioning before tougher enemies appear later.
Sanity Leeches
Unlike Rain Eaters, these creatures target your Sanity instead of your Health.
Large swarms can quickly drain your sanity if you find yourself surrounded for too long. Divers with the Blessed Blood trait can remove them more safely since the leeches die shortly after attaching.
Great Rain Serpent
The Great Rain Serpent is part of the game’s progression system.
Offer it a Delicacy, and it will take you to hidden locations while also opening important shortcuts. New Rain Serpents appear as you collect more Eldritch Idols, so return to earlier areas later in the campaign.
Shell Doors
Shell Doors open from only one side.
Whenever you discover one, unlock it before leaving the area. This will save considerable travel time on future dives.
Eastern Farmlands
The Eastern Farmlands introduce environmental dangers and much more aggressive enemies.
Most threats here punish careless movement rather than direct conflict.
Spiderweb Coral
Spiderweb Coral obstructs several paths.
Cutting it with your Diving Knife clears the way, but doing so immediately alerts nearby Crawling Aberrations.
Think before cutting if you aren’t prepared for a chase.
Crawling Aberrations
You’ll usually find two Crawling Aberrations in this biome.
These monsters can be extremely dangerous early on. If one catches you, expect around 40–50 Health damage, which can end many early dives.
Locusts
Locusts hide by blending into their surroundings.
Getting too close wakes the swarm, but your Needle Gun takes them out instantly before they can become a problem.
Plague Flowers
Plague Flowers damage both Health and Sanity whenever you pass through them.
You have two choices to handle them:
- Seal them with Foam Darts
- Wear the Poison Diving Suit and ignore them completely
Iron Gates
Iron Gates block access to various parts of the biome.
You need Corrosive Darts to break them and continue your exploration.
Stalker Well
Stalker Well shifts the pace dramatically.
Instead of fighting enemies, you’ll spend most of your time avoiding creatures that cannot be killed.
Stalkers
Stalkers hunt any diver using a light source.
Turn off your light whenever possible, or distract them with a Glow Stick. A thrown Glow Stick keeps their focus for about 3 to 5 seconds, giving you time to escape.
No weapon can destroy a Stalker.
Beacon Jellyfish
Beacon Jellyfish slow you down whenever you touch them.
Their biggest threat isn’t the slowdown; they also attract nearby Stalkers, making escapes more difficult.
These jellyfish only appear in Blessed Areas.
Crimson Basin
Crimson Basin features several story-related mechanics along with some of the toughest enemies in the game.
Faceless Shark
The Faceless Shark attacks with fast, direct charges.
Watch its movement before choosing a route, since dodging sideways is safer than trying to outrun it.
Blessed versions are even more dangerous; in addition to their regular attack, they also emit a Sanity-draining aura.
Like Stalkers, these sharks cannot be killed.
Bleeding Offspring
These odd growths limit your vision and block important pathways.
You can remove them with Foam Darts, and several story objectives require you to clear them before moving forward.
Bubble Columns
Bubble Columns obstruct movement through certain passages.
Shoot a Foam Dart into the column to seal it and reopen the route.
Graveyard
The Graveyard emphasizes positioning over combat.
Two linked mechanics create one of the deadliest areas in the game.
Gravekeeper
A Gravekeeper usually ignores you.
However, everything changes once the Siren of Despair begins singing.
At that point, every Gravekeeper you’ve activated becomes an instant-kill threat, so it’s generally wiser to escape than to fight.
Siren of Despair
The Siren pauses briefly before singing.
Its song awakens nearby Gravekeepers and creates one of the most dangerous encounters in the game.
The Siren also has very high Health, making direct combat an unreliable strategy.
The Chasm
The Chasm combines exploration with puzzle rooms.
Advancing requires correctly clearing each section rather than rushing ahead.
Parasites
Several puzzle rooms have Parasites.
You must eliminate all the Parasites in the room before the next section can open.
If a door won’t unlock, search carefully for any remaining Parasites nearby.
Endrain Village
Endrain Village is directly related to the ending.
Night Watcher
Interact with the Night Watcher by offering the required Statue.
This action starts the game’s ending sequence.
You can only perform this interaction once per save file.
The good news is that finishing the ending doesn’t permanently lock your progress. Once you reload your save, the game enters a free-play state where the Flood Countdown disappears, allowing you to continue exploring, gathering resources, and completing anything you missed.
Blessed Areas Explained
Blessed Areas completely change how a biome functions.
You create one by sacrificing a survivor at the biome’s Sacrificial Altar. The sacrifice is permanent, but it unlocks valuable late-game resources and progression.
After blessing a biome:
- Enemies become much stronger.
- Several enemies gain new behaviors.
- Blessed resources begin spawning.
- Flesh Masses appear throughout the biome.
Flesh Masses
Flesh Masses block important rewards.
Destroy them with the Blood Blade, which deals Occult Damage.
The first Flesh Mass you destroy always drops Crystallized Rain, one of the rarest upgrade materials in the game.
During a Gazing Moon event, you can also destroy Blessed Tumors with Moonbeams instead of the Blood Blade. This works even though it usually isn’t needed by the time you start farming Crystallized Rain.
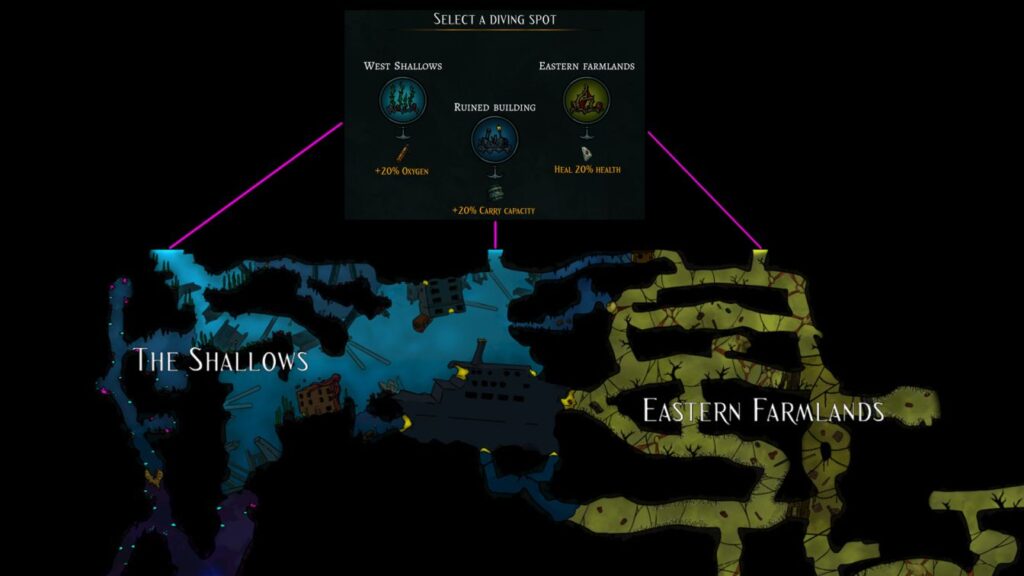
Diving Spots and Fast Travel
You don’t have to start every expedition from the same point.
Once you upgrade the Diving Deck and assign a survivor to work there, you unlock more starting locations.
These alternate dive points save significant travel time when farming later biomes.
There are a few important rules:
- You must discover a dive location during a previous expedition before it becomes available.
- Each unlocked starting point grants a bonus for that dive.
- You can safely return to the surface from three different exit points, giving you more flexibility than going back to your original entrance.
Planning your starting location based on your objective can easily save several minutes during each expedition.
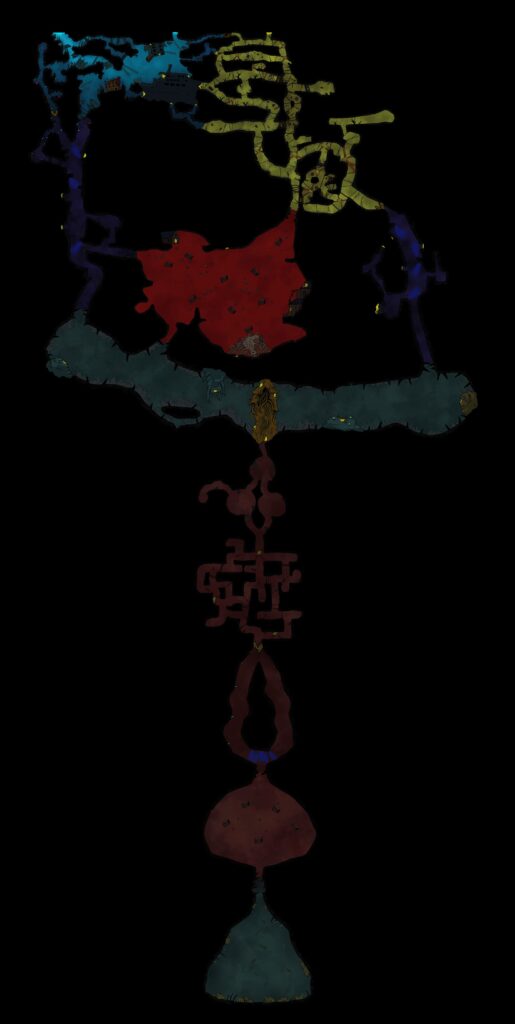
Dive or Die Map (Spoiler)
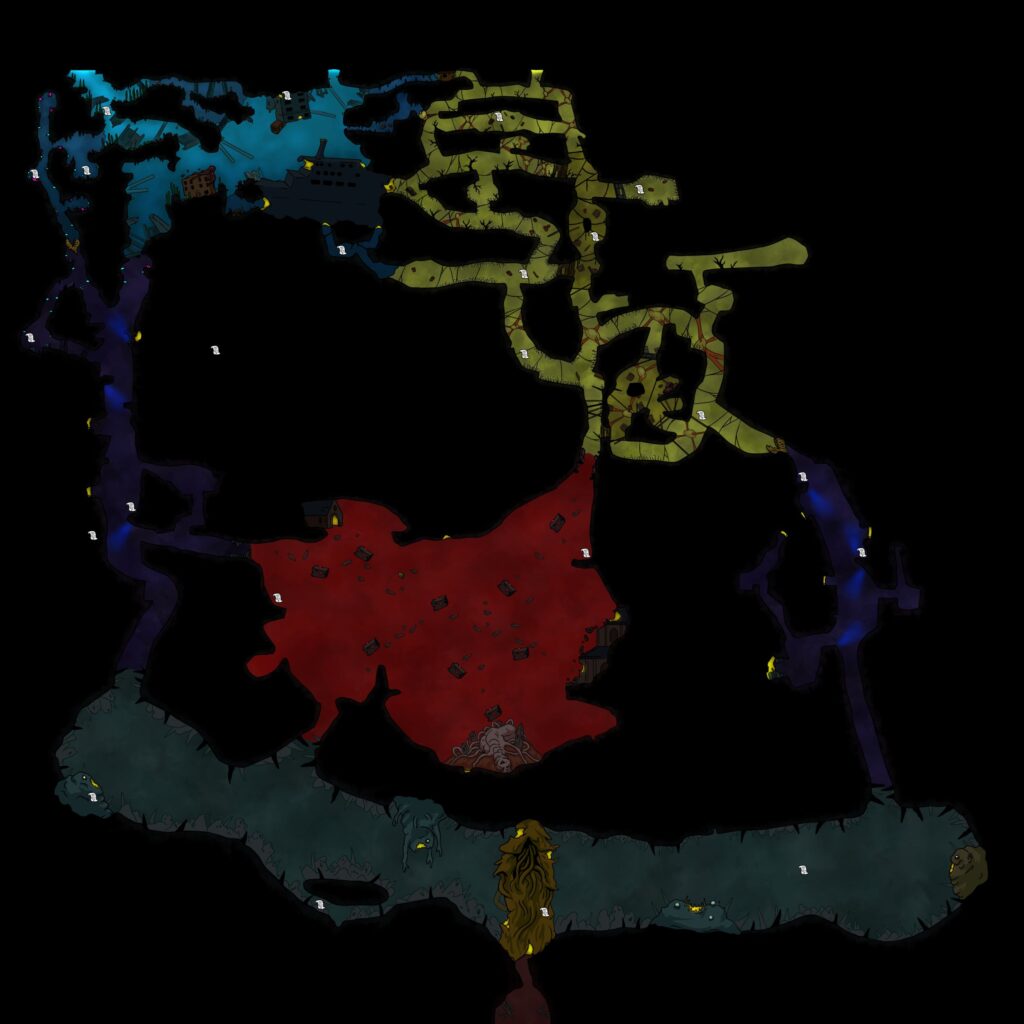
Dive or Die Journal Locations
Scattered across the world are 30 Journal pages that gradually reveal the world’s history.
Unlike many collectibles, you don’t need to collect them in chronological order. The Logbook automatically arranges every page correctly after you pick it up.
That means you can explore naturally without worrying about finding a specific entry first.
As of now, the community has confirmed all 30 journals, although the following map has only marked 23 locations.
| Journal Entry |
|---|
| June 17th, 1 R.E. |
| June 29th, 1 R.E. |
| July 12th, 1 R.E. |
| August 3rd, 1 R.E. |
| September 12th, 1 R.E. |
| October 25th, 1 R.E. |
| December 25th, 1 R.E. |
| March 7th, 2 R.E. |
| September 2nd, 2 R.E. |
| March 30th, 3 R.E. |
| April 12th, 3 R.E. |
| April 17th, 3 R.E. |
| April 25th, 3 R.E. |
| May 1st, 3 R.E. |
| May 16th, 3 R.E. |
| January 6th, 4 R.E. |
| April 6th, 4 R.E. |
| July 8th, 4 R.E. |
| April 22nd, 6 R.E. |
| June 6th, 6 R.E. |
| June 6th, 6 R.E. (Second Entry) |
| July 15th, 1 P.R. |
| August 8th, 1 P.R. |
| November 30th, 1 P.R. |
| March 1st, 3 P.R. |
| October 7th, 3 P.R. |
| June 28th, 4 P.R. |
| April 14th, 5 P.R. |
| November 13th, 5 P.R. |
| April 2nd, 6 P.R. |
Community Tips for Missing Journals
Players have verified that journal pages are linked to fixed locations, not their dates. If the order in your log looks different from someone else’s, that’s completely normal.
Recent community discoveries have also revealed several new journal locations, including:
- Inside floating structures in the Crimson Basin.
- On top of the L-shaped cliff in the Crimson Basin.
- Inside and around the Chapel connected to the Eastern Stalker Well.
- In passageways between the Eastern Stalker Well and the Chapel.
- Inside another floating building near the Church Altar.
If you’re missing just one or two pages, revisit every known journal location instead of searching by date. The date in the logbook doesn’t indicate where that page is located.
Rain Serpents Explained
The Great Rain Serpents are one of the game’s most important progression mechanics. They aren’t random events or optional shortcuts. You must use them to reach several hidden areas and recover all eight Eldritch Idols.
Many players waste an entire day searching for a serpent that hasn’t appeared yet. The reason is simple—Rain Serpents unlock gradually as you collect more Idols.
Every time you recover another Eldritch Idol, a new Rain Serpent appears somewhere in the world. Once it has spawned, it stays available on future dives, so you never have to unlock the same serpent twice.
How Rain Serpents Work
Here’s what you should know before hunting them:
- Every new Idol unlocks another Rain Serpent somewhere on the map.
- Each serpent has a fixed spawn location.
- Every serpent always leads to the same destination.
- Most serpents work as one-way passages.
- You must offer a Delicacy before the serpent lets you pass.
Only one known exception exists. The northwestern Rain Serpent in the Crimson Basin connects to another serpent inside the Western Stalker Well, creating a two-way connection between those areas.
Community testing also confirmed that you can recover the first few Idols during a single expedition if you already know the routes. After that, new serpents only appear after returning to camp, so later Idols naturally take more in-game days.
All Eldritch Idol Explained
Recovering an Idol gives you two permanent rewards:
- A unique active ability that your diver can use.
- A permanent Dark Arts upgrade that strengthens your settlement.
Each Idol changes how you approach exploration, so it’s worth understanding what every power actually does.
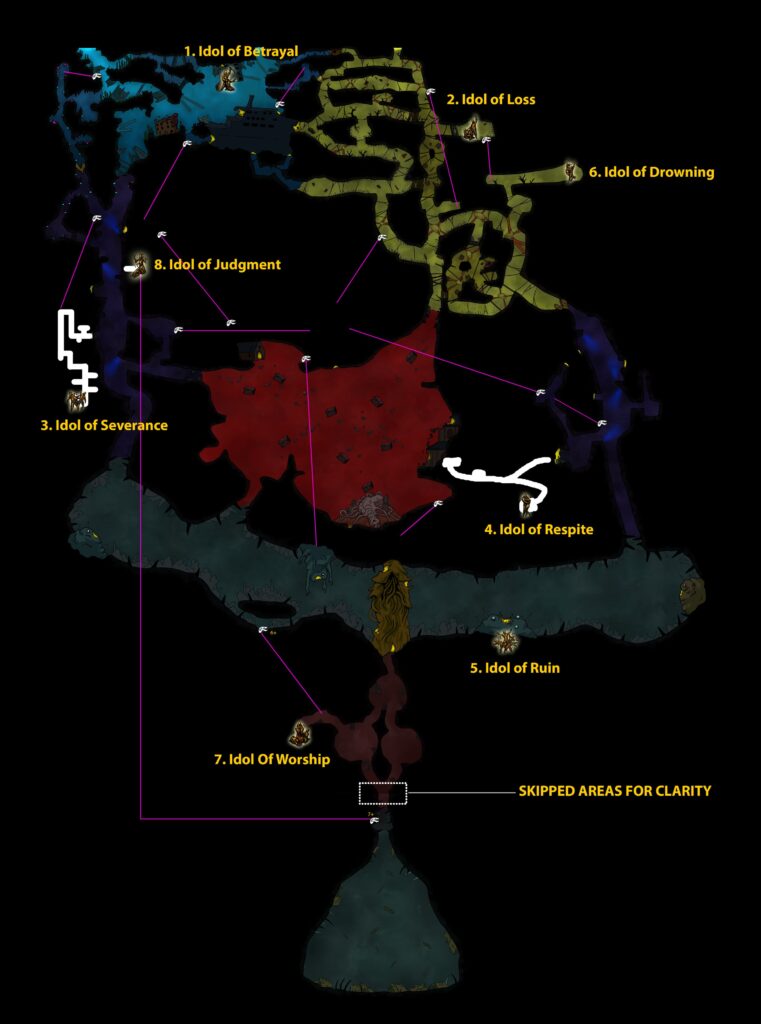
Idol of Betrayal
Active Ability — Pacify
Cooldown: 120 seconds
Pacify calms nearby small enemies for 15 seconds.
This ability creates a safe opening whenever several smaller enemies block a narrow path. It won’t solve every dangerous encounter, but it’s excellent for escaping crowded rooms without wasting resources.
Dark Arts Bonus
| Level | Effect |
|---|---|
| I | Survivors recover 3 Sanity every day. |
| II | Survivors recover 5 Sanity every day. |
| III | Survivors recover 7 Sanity every day. |
| IV | Survivors recover 10 Sanity every day. |
Idol of Loss
Active Ability — Disincarnate
Uses: Once per dive
Disincarnate instantly returns you to the surface.
The escape isn’t free.
You leave every droppable item behind and lose half of your current Health and Sanity, but you save your diver instead of dying.
This ability becomes extremely valuable when you discover a dangerous area much earlier than expected.
Dark Arts Bonus
Your Lighthouse expeditions become more successful based on the number of dead survivors.
| Level | Bonus per Dead Survivor | Maximum Bonus |
|---|---|---|
| I | +1% | +8% |
| II | +2% | +16% |
| III | +3% | +24% |
| IV | +4% | +32% |
Idol of Severance
Active Ability — Farewell
Cooldown: 120 seconds
Farewell surrounds your diver with Eldritch energy.
For the next 10 seconds, your movement speed doubles and slow effects no longer affect you.
This is one of the strongest movement abilities in the game because it works against several dangerous environmental hazards.
Dark Arts Bonus
| Level | Swimming Speed |
|---|---|
| I | +3% |
| II | +6% |
| III | +9% |
| IV | +12% |
Idol of Respite
Active Ability — Haven
Uses: Once per dive
Haven restores 35% of your maximum Oxygen.
You don’t need to return to the surface or consume an oxygen item, making this ability especially useful during long exploration routes.
Dark Arts Bonus
| Level | Camp Upkeep Reduction |
|---|---|
| I | -1 Nutrition and Morale |
| II | -2 Nutrition and Morale |
| III | -3 Nutrition and Morale |
| IV | -4 Nutrition and Morale |
Lower upkeep becomes surprisingly valuable once your camp population starts growing.
Idol of Ruin
Active Ability — Ruin
Cooldown: 120 seconds
Ruin destroys nearby enemies and resource nodes inside a small radius.
Enemies that normally can’t die won’t be destroyed, but the ability still interrupts them and pacifies them for 3 seconds.
This short stun creates enough breathing room to escape situations that would otherwise trap you.
Dark Arts Bonus
Survivors earn bonus experience for every negative condition they currently have.
| Level | Experience Bonus |
|---|---|
| I | +20% |
| II | +30% |
| III | +40% |
| IV | +50% |
Idol of Drowning
Active Ability — Last Breath
Uses: Once per dive
Last Breath freezes your current condition for 45 seconds.
During that time:
- Health cannot change.
- Sanity cannot change.
- Oxygen cannot change.
When the effect ends, your diver dies immediately.
This ability is extremely situational. It can save an impossible dive, but you should only activate it when you’re certain those 45 seconds are worth sacrificing the survivor.
Dark Arts Bonus
| Level | Oxygen Capacity |
|---|---|
| I | +10% |
| II | +15% |
| III | +20% |
| IV | +25% |
Idol of Worship
Active Ability — Hear Our Prayer
Uses: Once per dive
This power summons one to three random Boon Fish near your current location.
The exact fish you receive is random, making this ability a nice source of extra supplies during difficult expeditions.
Dark Arts Bonus
| Level | Effect |
|---|---|
| I | Worship Gauge gains +20%. Burning tributes grants +50% EXP. |
| II | Worship Gauge gains +40%. Burning tributes grants +75% EXP. |
| III | Worship Gauge gains +60%. Burning tributes grants +100% EXP. |
| IV | Worship Gauge gains +80%. Burning tributes grants +125% EXP. |
Idol of Judgment
Active Ability — Tides of Time
Cooldown: 300 seconds
When activated, the game records:
- Your position
- Your Health
- Your Sanity
- Your current status
Exactly 10 seconds later, you’re teleported back to that saved location with the same recorded condition.
This ability works almost like a temporary checkpoint. You can rush through dangerous areas, grab an important item, and return to safety once the timer expires.
Dark Arts Bonus
Every newly recruited survivor joins your camp at a higher level.
| Level | Starting Level Bonus |
|---|---|
| I | +1 Level |
| II | +2 Levels |
| III | +3 Levels |
| IV | +4 Levels |
Higher starting levels save a huge amount of training time, especially during the late game.
Which Idol Should You Prioritize?
Each Idol has its own strengths, but a few stand out immediately:
- Idol of Severance is one of the best exploration tools thanks to its massive speed boost.
- Idol of Respite makes long dives much safer by restoring Oxygen without consumables.
- Idol of Judgment is incredibly useful when exploring unfamiliar areas because it effectively gives you a temporary rewind.
- Idol of Ruin creates valuable escape opportunities against enemies that normally can’t be killed.
The remaining Idols are more situational, but every Dark Arts upgrade permanently improves your settlement. That alone makes collecting all eight Idols a top priority before the Flood Countdown expires.
Sacrificial Altars & Blessed Resources
Blessing a biome is one of the biggest progression milestones in Dive or Die – Children of Rain. Until you do it, several crafting materials, upgrades, and end-game resources remain locked.
Many players delay this because sacrificing a survivor feels like a huge loss. In reality, waiting too long usually hurts your run more than losing one recruit.
Once a biome is Blessed, you’ll unlock new resources, stronger enemies, and one of the game’s most valuable upgrade materials.
How to Get Blessed Resources
You can obtain Blessed Resources in several ways, but not every method is equally reliable.
| Method | Permanent? | Notes |
|---|---|---|
| Gazing Moon Event | ❌ No | Temporarily Blesses resources during the event. |
| Gargantuan Carcass Expedition | ❌ No | Rewards depend on RNG. |
| Mysterious Pyramid Expedition | ❌ No | Only certain Blessed materials can appear. |
| Crimson Basin Chapels | ❌ No | Rare drops and inconsistent farming. |
| Sacrificial Altars | ✅ Yes | Permanently Blesses an entire biome. |
If you’re planning long-term progression, Sacrificial Altars are by far the best option.
How Sacrificial Altars Work
Every major biome contains a Sacrificial Altar.
Once you interact with one, you can permanently sacrifice a survivor.
The survivor dies immediately, so don’t send one of your strongest divers unless you’re absolutely certain.
After the sacrifice, a short cutscene with Old Jack confirms that the surrounding biome has become Blessed.
From that point onward, every future dive into that biome will use the Blessed version of the area.
Altar Locations
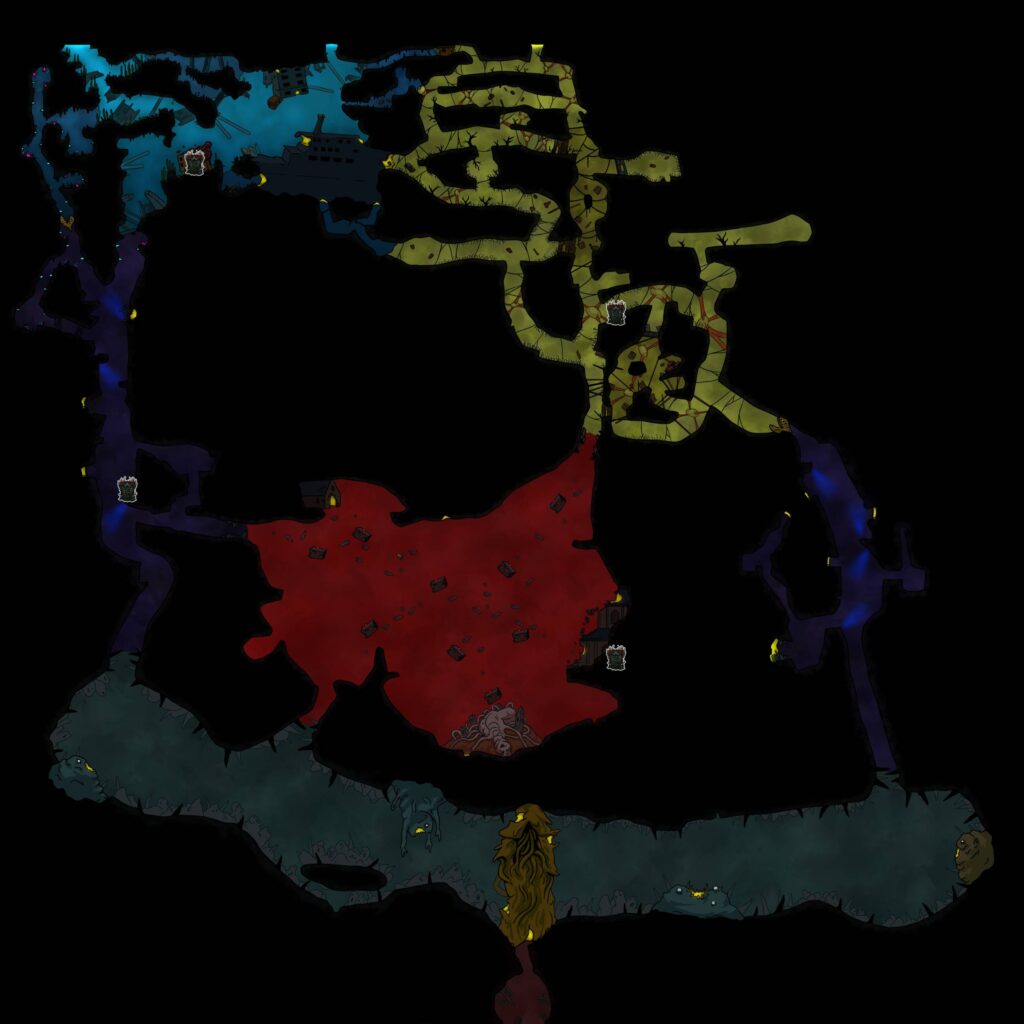
Each major biome has one Sacrificial Altar.
The Stalker Well counts as both its eastern and western sections, so blessing it affects both sides.
Once you’ve Blessed a biome, you never need to repeat the sacrifice there again.
What Changes After Blessing a Biome?
Blessing an area affects much more than resource nodes.
The entire biome becomes significantly more dangerous.
Stronger Enemies
Every enemy gains more Health and deals much higher damage.
If you’re already struggling in a biome, consider upgrading your equipment before blessing it.
Faster Crawling Aberrations
The Eastern Farmlands become much more dangerous.
Instead of one major threat, the area now contains two Crawling Aberrations, and both move considerably faster than before.
Escaping them becomes much harder without good movement speed.
New Enemy in Stalker Well
Blessing the Stalker Well also introduces an additional enemy.
It’s less threatening than a Crawling Aberration, but it can still catch careless divers by surprise, especially in narrow tunnels.
Blessed Resource Nodes
This is the main reason most players Bless a biome.
Afterward, many mineral nodes change into their purple Blessed variants.
You’ll need these Blessed materials for several mid-game and late-game recipes, so delaying this upgrade also delays your entire crafting progression.
Keep in mind that not every resource has a Blessed version.
These materials always stay normal:
- Plastic
- Copper
- Carbon
Everything else depends on the biome you’re exploring.
Blood Tumors
Blessing a biome also causes strange Flesh Masses—often called Blood Tumors by the community—to appear at fixed locations.
These growths block one of the game’s rarest crafting materials.
Normally, you need the Blood Blade to destroy them.
The first Blood Tumor you destroy always rewards Crystallized Rain.
Community testing also confirmed another trick.
During a Gazing Moon event, Moonbeams can destroy these Tumors without the Blood Blade. It’s a niche strategy, but it works if you reach one before crafting the weapon.
When Should You Sacrifice a Survivor?
The game never tells you the best time, but waiting too long usually creates more problems than it solves.
You should consider blessing a biome once:
- You know you’ll need Blessed Resources soon.
- You already have a replacement diver.
- Your strongest diver isn’t the one being sacrificed.
Early sacrifices can feel expensive, but they often save multiple in-game days later because you won’t need to stop progression just to unlock Blessed materials.\
Crystallized Rain
Crystallized Rain is one of the rarest crafting materials in the entire game.
You’ll eventually need it for the final upgrades across multiple buildings, so farming it becomes unavoidable during the late game.
How to Unlock Crystallized Rain?
You won’t find this material during normal exploration.
First, you must Bless the biome where it’s located by sacrificing a survivor at that area’s Sacrificial Altar.
On your next dive, new Flesh Masses appear throughout that biome.
Destroying them reveals the Crystallized Rain hidden inside.
You Need the Blood Blade
Most Flesh Masses cannot be destroyed with normal weapons.
You need the Blood Blade upgrade before you can cut through them and collect the crystal.
The only exception is during a Gazing Moon event, where Moonbeams can destroy the Tumors instead.
Crystallized Rain Respawns
At first, it looks like there aren’t enough crystals to fully upgrade your settlement.
That’s because they respawn.
Community testing confirmed that Crystallized Rain eventually reappears at the exact locations where you previously collected it.
The game doesn’t currently explain what triggers the respawn, and players still haven’t confirmed whether it’s tied to dives, days, or another hidden mechanic.
For now, the best strategy is simple:
- Revisit every known spawn point regularly.
- Check them whenever you return to that biome.
- Don’t assume a location is permanently empty.
Known Spawn Locations
We have marked 12 possible Crystallized Rain locations, although a few positions were uncertain.
Since then, the community has confirmed several additional spots.
Known locations include:
- Inside the large skull in the Graveyard.
- Inside one of the floating structures in the middle of the Crimson Basin.
- Inside a side structure in the Western Stalker Well.
- Near the first prison corridor in the Western Stalker Well.
- Several Flesh Mass locations spread across the Blessed biomes.
Some players have reported finding 11 confirmed spawn locations, while others still believe all 12 exist. Until every location is verified, it’s worth checking every known spawn point during your farming runs.
Community Strategy for Managing the Flood Timer
One interesting strategy shared by experienced players involves using Sacrificial Altars much more aggressively.
Instead of avoiding sacrifices, they recruit new survivors whenever possible and use lower-level recruits as offerings.
After upgrading the Library, new recruits can arrive at Level 2. With the Born Forager expedition trait, some expeditions even return Level 4 survivors.
Those recruits can be sacrificed immediately to generate Worship without risking experienced divers.
This strategy makes it much easier to extend the Flood Countdown on harder difficulties while keeping your strongest exploration team alive.