Rubinite rewards exploration just as much as it does boss fights. Most achievements unlock naturally as you progress through the story, but the game also hides many optional goals behind boss mechanics, secret areas, and choices that are easy to miss. While you can return for many of them later, knowing when they appear can save you a lot of backtracking.
This guide outlines all Rubinite achievements in the order you’re most likely to encounter them. Story achievements are mentioned first, followed by the missable ones and each collectible needed for 100% completion.
Rubinite Achievements Overview
| Type | Total |
|---|---|
| Total Achievements | 38 |
| Story Achievements | 24 |
| Missable Achievements | 14 |
Most players will unlock the 24 story achievements during a regular playthrough. The remaining achievements will be unlocked from optional objectives, boss challenges, hidden secrets, and collectibles.
Rubinite Story Achievements
These achievements are tied directly to the main story on Normal difficulty. As long as you keep moving forward, you’ll unlock almost all of them naturally.
Wake Up From a Nightmare
You earn your first achievement as soon as the game begins. Finish the opening sequence and wake from the nightmare.
There’s nothing special you need to do here.
Defeated the Beast
The Beast is the first major boss in Rubinite.
Win this fight to continue the story, and the achievement unlocks right after the battle.
Repelled the Guardian
The Guardian is your next required boss.
Defeat it to keep exploring the monastery and gain another story achievement.
Choose Your Path:
After defeating the Guardian, the story divides into two routes.
You can travel:
- North toward the Priest route
- South toward the Grave Keeper route
The order doesn’t matter because you’ll eventually clear both paths before the story progresses.
The northern route is generally easier, so that’s the order used in this guide.
Defeated the Dual Cultists
Head north until you get to the arena where the Dual Cultists wait.
Win this fight to unlock the achievement.
Defeated the Martyred Angel
Continue on the northern route after defeating the Dual Cultists.
The Martyred Angel is the next required boss on this path. Beat it to earn the achievement.
Defeated the Grave Keeper
Return to the southern route once you’ve completed the northern section.
The Grave Keeper can be frustrating because several attacks have larger hitboxes than they seem. Be patient instead of rushing for damage when it starts swinging.
The achievement unlocks after the fight ends.
Defeated the Plague Bearer
Keep moving deeper into the southern area until you reach the Plague Bearer.
This boss likes to split and attack you from multiple directions, but regular sword attacks usually work better than relying heavily on Focus Strikes.
Defeat it to move the story forward.
Defeated Faye
Your next major battle is a rematch against Faye.
Winning this fight opens the large gates that block the next part of the game.
Defeat the Ghost
Grant becomes your next opponent.
His invisibility can seem daunting at first, but one Focus Mark is enough to track his position while he disappears.
The Thorns Charm also helps by dealing damage to his armor whenever he touches it.
Beat Grant to unlock the achievement.
Defeated Roy
Roy is one of the cleaner boss fights in Rubinite.
Most of his attacks have clear animations before they happen, so learning those tells is more important than attacking all the time.
Defeat Roy to keep going.
Defeated the Witch
Your next required boss is Alcina.
She has several dangerous attacks, but once you learn her patterns, the fight becomes much easier.
Beat Alcina to unlock the achievement.
Maybe the End
After defeating Alcina, watch the ending and let the credits roll.
The achievement unlocks once the credits finish.
Escape the Illusion
Load your completed save after the credits.
You’ll return before the ending and gain access to the real world, which unlocks this achievement.
True Difficulty
You’ll face the Beast one more time after escaping the illusion.
Defeat it again to earn this achievement.
First Encounter?
Keep going through the real-world storyline until you meet Mira after the first Faye encounter.
Talking to her unlocks the achievement automatically.
Someone Else’s Past
Later in the story, you’ll fight Grant again.
After the battle, Mira opens the final hidden room.
Walk inside and interact with the Swan to unlock this achievement.
Defeated the Red-Eyed Tree
Mira opens the path to this boss right after the previous achievement.
Enter the new area, defeat the Red-Eyed Tree, and the achievement is yours.
Defeated… Myself?
Beat Roy again during the real-world storyline.
After the battle, enter his mind and defeat your shadow.
The achievement unlocks after you win this second fight.
Remove the Curse
This achievement unlocks right after defeating your shadow.
No extra steps are needed.
Defeated the Puppeteer
You’ll meet the Puppeteer shortly before the final battle against Alcina.
Win the fight to unlock the achievement.
Obtain the Legendary Rubinite
Continue the story after defeating the Puppeteer.
You’ll receive the Legendary Rubinite almost immediately afterward, unlocking another story achievement.
Leave the Rest to Me!
Before the final battle, talk to Mira.
Choose the dialogue option where you promise everything will be fine. After doing that, enter the final fight against Alcina.
The achievement unlocks after you make that promise.
Save the Kingdom
Finish the game on any difficulty to earn this achievement.
RUBINITE
Complete the game on Normal difficulty.
This is the final story achievement and marks the end of the main campaign.
Rubinite Missable Achievements
Most of Rubinite’s missable achievements rely on specific boss mechanics or optional interactions. The good news is that almost all of them can still be earned by replaying boss fights or exploring unfinished areas later. Even so, it’s much faster to grab them the first time you encounter each boss.
Amulets? Pffft. Forget Them
You earn this achievement by defeating a boss without equipping any talisman.
The easiest time to do this is during one of the opening fights, such as:
- The Beast
- The first Faye battle
Those encounters are designed around having little or no equipment, so removing your talisman doesn’t make them much harder.
True Hunter
Defeat any boss without taking damage.
The first Faye fight is the best place to try for this achievement because her attacks are straightforward and easy to memorize after a few attempts.
If you get hit even once, restart the fight and try again.
I’m Not Tasty at All!
You can unlock this during the Dual Cultists fight.
One of the cultists uses a grab attack that swallows your character. Instead of dodging it, let the grab connect once.
After escaping the attack, the achievement will pop up.
Bomb Disposal Expert
You can earn this achievement during the Grave Keeper fight.
After one of his spinning attacks, the boss throws several small blobs onto the area. Those blobs eventually grow into exploding bombs.
Destroy every blob while it’s still small.
If even one bomb grows and explodes later, you’ll need to try again.
Alternate Method:
The Grave Keeper doesn’t always use this attack.
If you defeat him before he performs the bomb attack, no bombs will spawn, and the achievement unlocks automatically at the end of the fight.
Plague It Cool
This is one of the trickier achievements in the game.
During the Plague Bearer fight, the boss splits into multiple bodies.
Here’s what you need to do:
- Damage the boss until it splits for the first time.
- Ignore the smaller piece.
- Keep attacking the larger body.
- Force it to split a second time.
- Only keep fighting after three separate bodies are on the field.
If you kill the smaller form too early, you’ll miss the achievement and have to try again.
Out of Body
You unlock this achievement during the battle against Grant.
Grant sometimes damages himself to remove his armor.
You must defeat him before he does that.
Stay aggressive throughout the fight and break his armor quickly so he never gets a chance to hurt himself.
Don’t Even Think About It
This achievement occurs during the second fight against Faye.
Throughout the battle, she’ll try several grab attacks.
You must parry every single grab she performs.
A successful parry counts.
Dodging the grab does not count.
Missing even one grab will fail the attempt, so restart the fight if either of those happens.
The second phase is actually easier because Faye uses the grab attack less often.
You Dare Use My Own Weapons Against Me, Ruby?
You won’t unlock this immediately after defeating Roy.
First, pick up Roy’s Daggers and equip them from the Charms menu.
After that:
- Return to the Monastery.
- Pray at the shrine.
- Enter Roy’s boss rematch.
- Throw a few daggers at him.
You don’t have to win the fight.
Just landing attacks with Roy’s own daggers is enough to unlock the achievement.
Illuminate the Night
Players often miss this achievement because there’s no reminder to come back later.
After defeating Roy, return to the Monastery and light every candle you can find.
The achievement unlocks once all the candles are lit.
Missed It?
If you finish the game without lighting the candles, reload your completed save.
The game sends you back before the final battles, giving you a chance to light the candles before finishing the story again.
Fulfilling a Wish
This achievement becomes available after upgrading every attack skill.
Once you unlock all attack upgrades, go downstairs and defeat the Penitent.
The achievement unlocks after the kill.
There You Are
This secret is just hidden before the Red-Eyed Tree boss.
Instead of entering the boss arena right away, go left until you reach what looks like a dead end in the wall.
There’s a hidden passage here.
Move through the invisible path in this order:
- Down
- Left
- Up
- Left
- Down
- Left
You’ll eventually find the hidden character and unlock the achievement.
You can also defeat the hidden NPC if you want.
Is It Really Missable?
Not permanently.
You can return after defeating the Red-Eyed Tree, as long as you don’t leave the area before searching for the hidden passage.
Collection Achievements
The last three achievements take longer than the others because they depend on exploration and progression rather than boss fights.
None are particularly hard, but you’ll spend time searching the Monastery, collecting Blood Dust, and cleaning up anything you missed before the ending.
Finder’s Keepers
You unlock Finder’s Keepers after opening every chest hidden throughout the Monastery.
Some chests are in plain sight, while others are behind scenery or tucked in corners that are easy to miss. If you explore carefully, you’ll usually hear an audio cue when you’re close to one, so it’s worth checking suspicious spots before leaving a room.
Below are all eight chest locations.
Main Room Chest
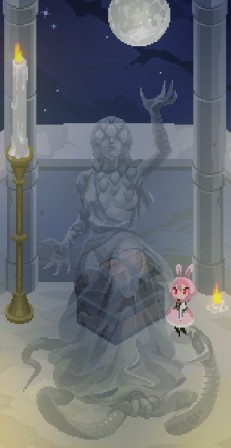
The first chest is in the Main Room.
Walk behind the large statue near the center. The statue almost completely hides the chest, making it easy to run past it without noticing.
Once you know where to look, it’s one of the easiest collectibles to grab.
Side Hall Chest
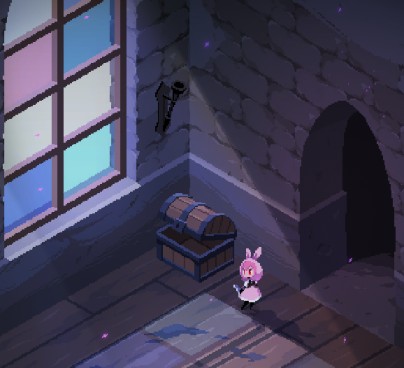
You’ll find another chest inside the Side Hall.
This one isn’t hidden well. Check the hallway as you move through the area, and you should spot it without much trouble.
Dining Hall Chest
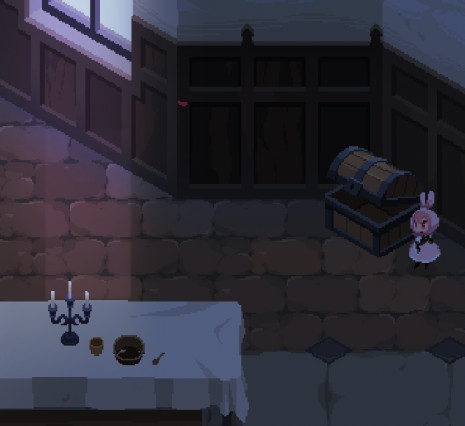
Head into the Dining Hall.
Look beside the large dining table and move slightly upward from its right side.
The chest is out in the open, but many players focus on the center of the room and accidentally walk past it.
Library Chest
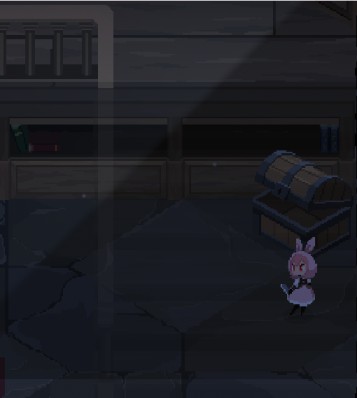
Travel to the Library next.
Instead of searching the bookshelves, check underneath the staircase.
The chest is tucked beneath the stairs and blends into the surroundings.
Courtyard Chest
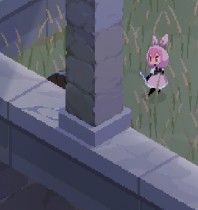
The Courtyard has another hidden chest.
Go to the second pillar on the left side and search beside its base.
The pillar blocks your view from most angles, making this easy to overlook during normal exploration.
Mirror Room Chest
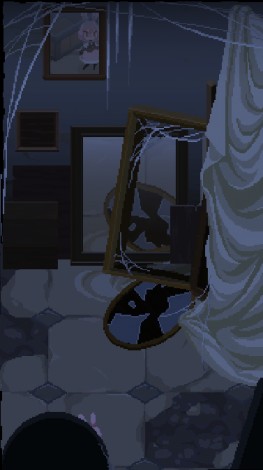
This is probably the cleverest hiding spot in the game.
When you enter the Mirror Room, look at the large mirror mounted on the wall.
The mirror shows the chest’s location.
Once you notice the reflection, head to the bottom-left corner of the room instead of searching near the mirror itself.
The chest will be there.
Abbot’s Office Chest
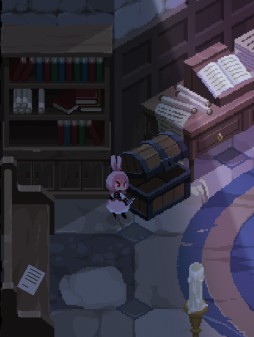
Visit the Abbot’s Office.
Unlike several earlier collectibles, this chest isn’t hidden behind scenery or secret walls.
Walk through the room and open it before leaving.
Sick Ward Chest
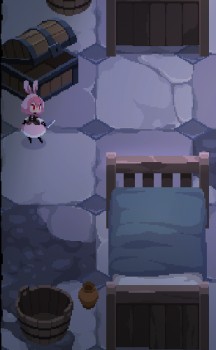
The final Monastery chest is inside the Sick Ward.
Search the beds until you find the chest nearby.
Open it to complete your collection.
Once you’ve looted all eight chests, the Finder’s Keepers achievement will unlock right away.
Talismans Connoisseur
This achievement requires you to collect every talisman in the game.
Most come from crafting, but a few are tied to story progression, so you can’t unlock them early.
To complete the collection:
- Repair every Broken Talisman through Wichiwi.
- Spend Blood Dust to craft every available talisman.
- Continue through the true ending route and collect the remaining story talismans.
- Don’t forget Roy’s Daggers, since they also count toward the collection.
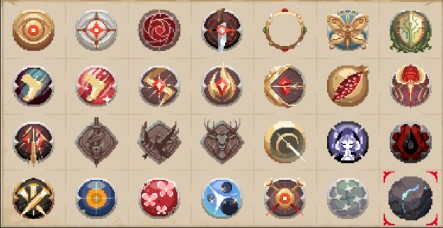
Many players report that the achievement unlocks when they get the Pure Rubinite, provided every other talisman that has already been collected. If you’re missing even one crafted talisman before that point, you may have to repeat the process in another playthrough.
Fully Fledged
This is the last progression achievement you’ll earn.
After escaping the illusion, Ruby’s skill tree changes significantly. Your health and potion upgrades disappear and are replaced with new damage-focused skills.
Spend enough Blood Dust to buy every upgrade in this new tree.
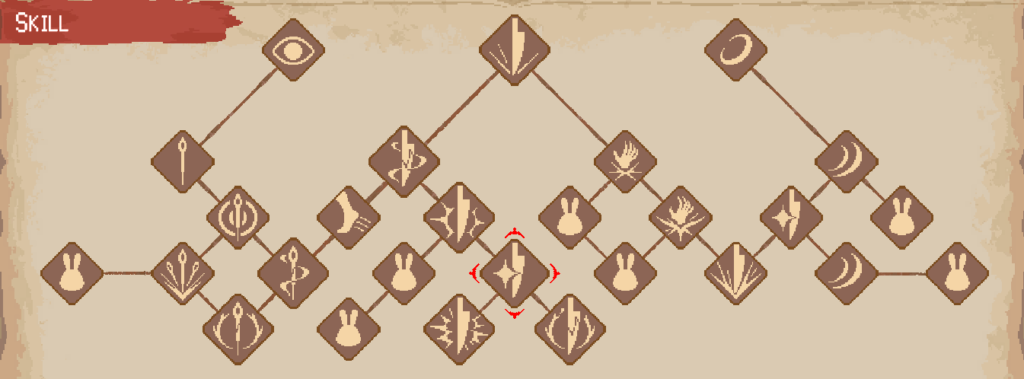
The achievement unlocks as soon as you purchase the final skill. Grinding extra Blood Dust is usually the longest part of this achievement, so don’t worry if it’s the last one on your list.
Final Tips
By the time you reach the true ending, you should already have most of Rubinite’s achievements. The remaining ones usually come from optional boss challenges, hidden collectibles, or small interactions that are easy to miss during a first playthrough.
Before entering the final stretch of the game, it’s worth taking a few minutes to double-check your progress.
100% Completion Checklist:
- Finish the main story on Normal difficulty.
- Continue the same save after Maybe the End to access the true ending.
- Complete every boss rematch achievement.
- Open all eight Monastery chests.
- Craft and collect every talisman, including Roy’s Daggers.
- Purchase every post-game skill upgrade with Blood Dust.
- Light every candle after defeating Roy.
- Complete every hidden interaction before entering the final castle sequence.
Can You Miss 100% Completion?
Not permanently.
Most Rubinite achievements can still be earned through boss rematches or by loading your completed save. The game sends you back before the final sequence, giving you another chance to finish optional objectives you missed earlier.
The only exception is that some collection-related achievements may not unlock properly if you wait until New Game+ to complete them. For example, several players have found that Talismans Connoisseur works more reliably when every talisman is collected during the same playthrough before getting the Pure Rubinite.